

Using the Teams test call feature is a quick and effective way to ensure your audio and video settings are optimized before every meeting. This allows you to check microphone and speaker quality, avoiding any potential issues like poor sound or an incorrect device selection.
By testing this feature beforehand, you can prevent disruptions and ensure smooth communication during important calls. Continue reading to discover how this feature can save you time and improve your meeting experience, offering a set of practical tips for troubleshooting and maximizing your call quality.
Why You Should Test Your Camera And Microphone
How to make a test call sounds more daunting than it looks. Testing your microphone and camera before a meeting is essential for several reasons:
- Technical difficulties: Identifying and resolving issues beforehand saves time and embarrassment during the meeting.
- Clear communication: A clear microphone and camera are vital for effective communication.
- Professionalism: It demonstrates that you are prepared and value the time of others.
- Improves meeting efficiency: Technical hiccups can disrupt the flow of a meeting, so being prepared helps maintain focus.
- Participant experience: Participants are more engaged when they can clearly see and hear the speaker.
Teams test call feature
Here’s a step-by-step guide and instructions for testing your camera on Microsoft Teams without needing to join a meeting:
1. Open the Microsoft Teams app on your desktop and log in if you haven’t already done so.
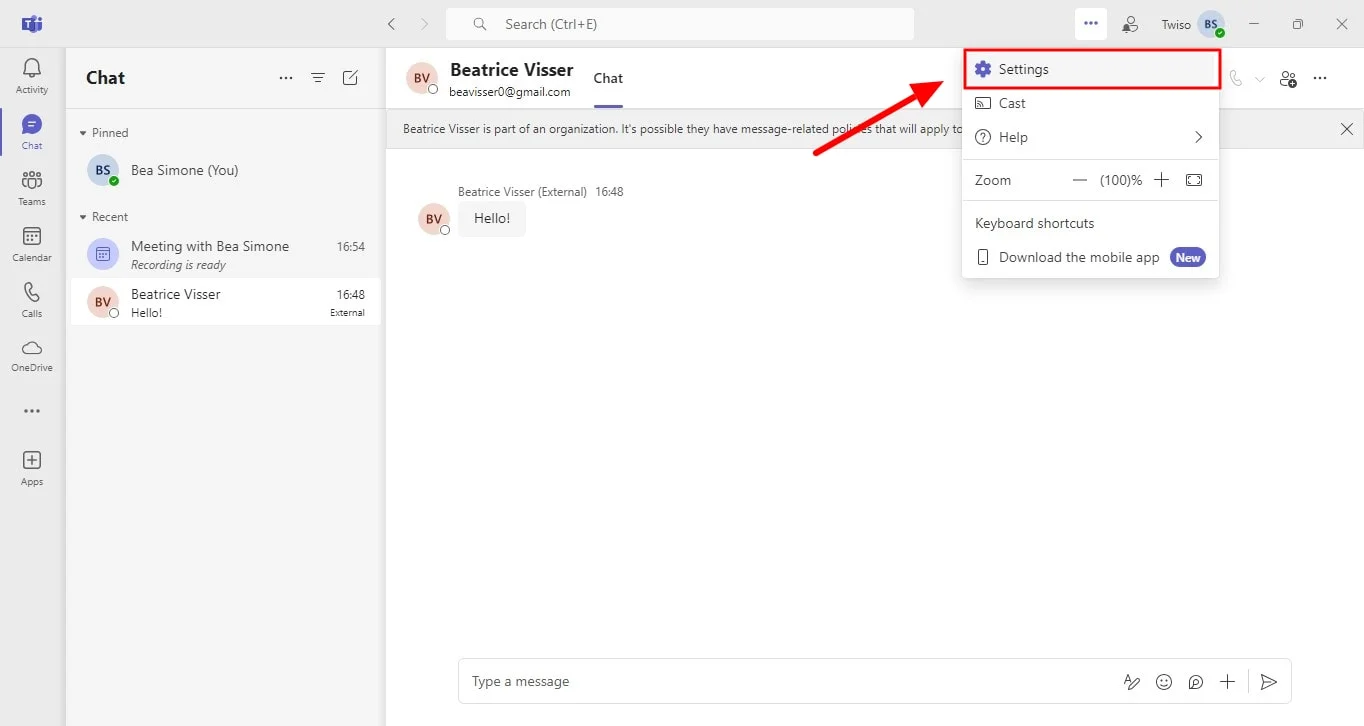
2. Click on your initials or profile picture in the upper right corner of the Teams interface. Then, select the three dots next to your profile picture to open the drop-down menu.

3. Choose "Settings."
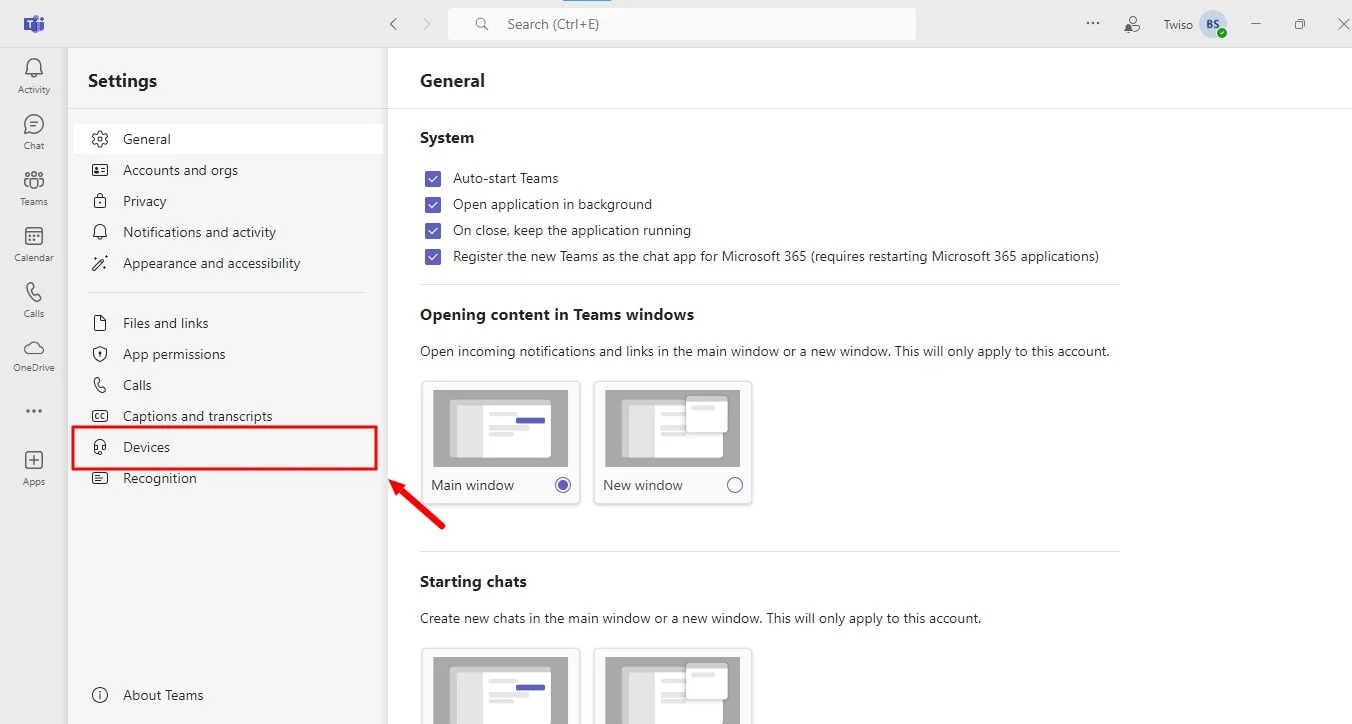
4. In the Settings window, click on the "Devices" tab. This is where you can manage both your audio and video settings.
5. Scroll down to locate the "Video settings" section. Here, you can select your camera and adjust its settings.
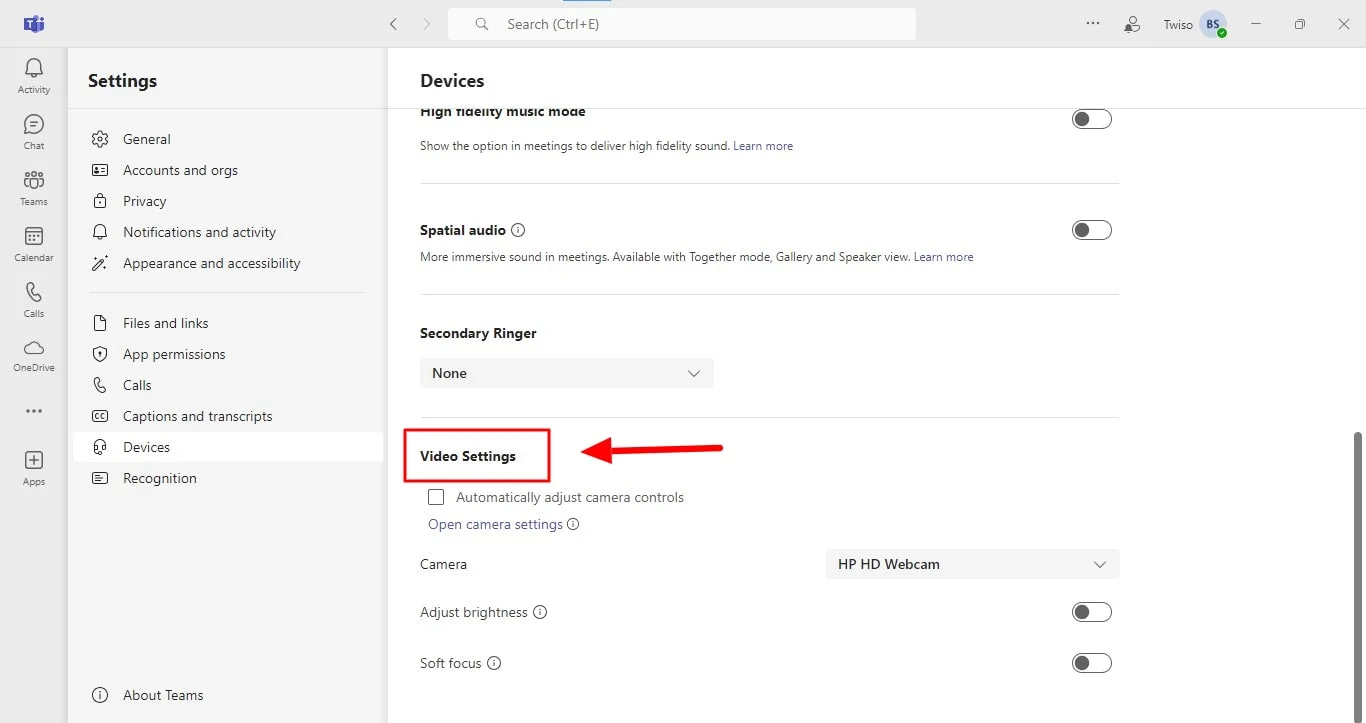
6. Use the Preview window to see how your video settings look before starting a Teams Test call. This window displays a live feed from your camera.
7. Check the video quality to ensure the image is clear and free of distortions. Make sure you are centered and fully visible in the frame. Adjust your camera's position or angle if necessary when you make a test call.
Test your microphone audio feature
Here’s a simple guide to testing your microphone’s audio quality in Teams test call without having to join a meeting:
1. Start the Microsoft Teams app on your PC or laptop and log into your Microsoft account if you haven’t done so already.
2. Click on your profile picture or initials at the top right corner of the Teams window. Then, click the (...) three dots next to your profile to access “Settings and more” on the menu.
3. In the Settings menu, select the "Devices" tab. This section allows you to manage your video and audio settings.
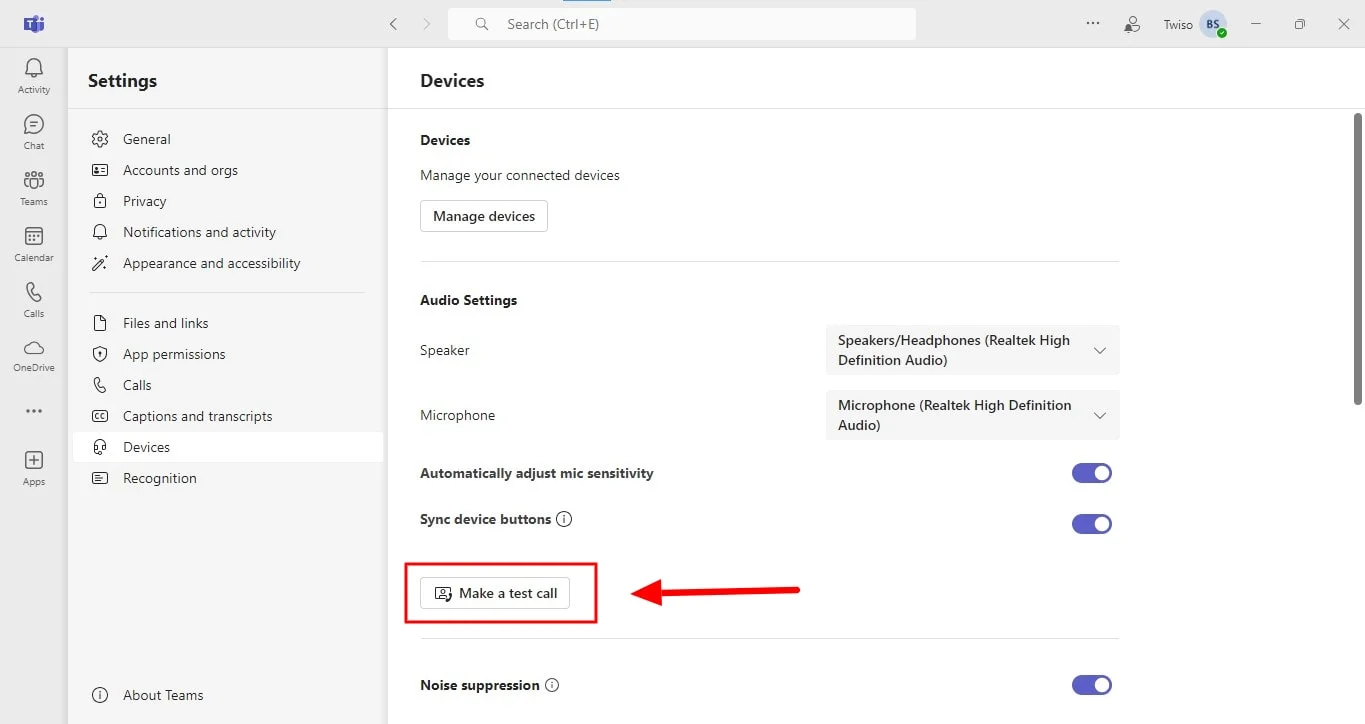
4. Find your "Audio Settings" section where you can select your preferred speakers and microphone, and adjust your audio settings as needed.
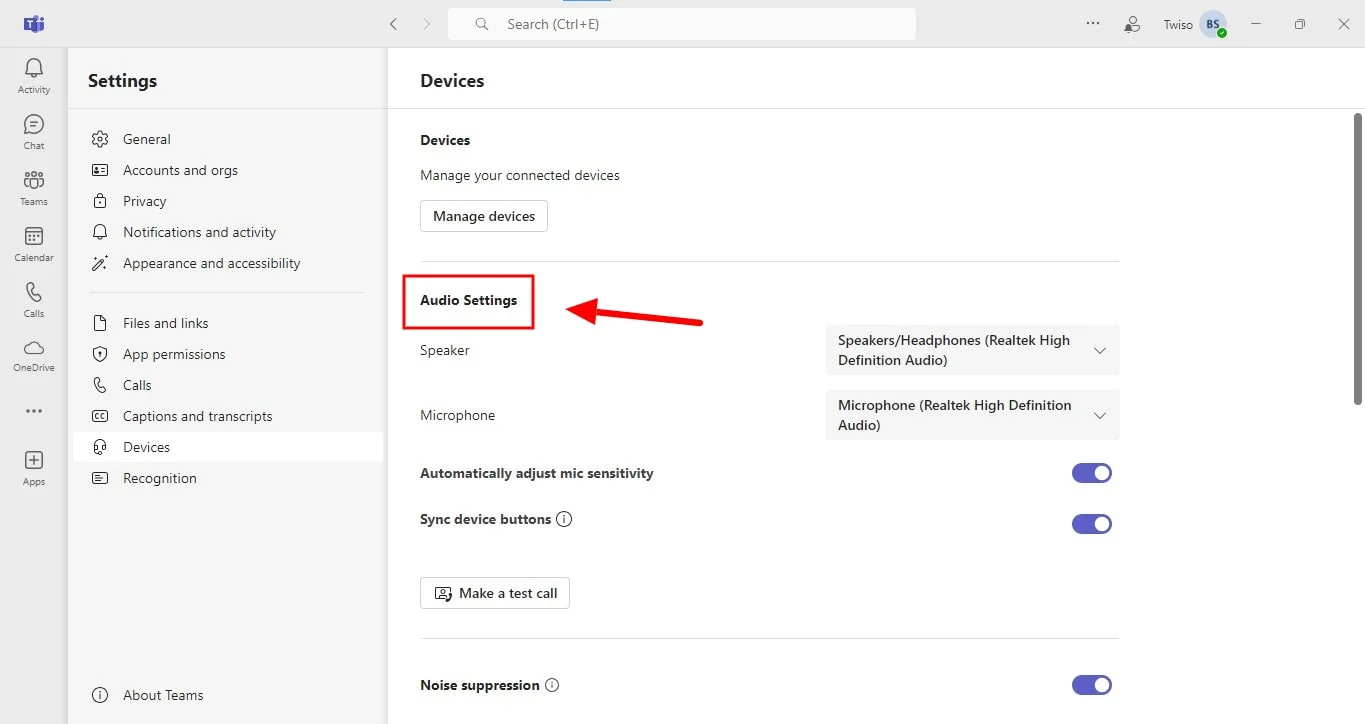
5. Click on "Make a test call" button to start a test call. You’ll be redirected to a test meeting with the Echo bot, asking you to speak. The bot will record you and play your audio recording again to verify your microphone is working correctly.
6. If your test call reveals any problems or if you want to make further adjustments, exit the test call to modify your other settings in the "Devices" tab. Run another test call to ensure the settings are correct.

Next Steps Following A Teams Test Call
For individual users of Microsoft Teams, the test call is the easiest method to assess and refine your call quality. By reviewing the results of your test call, you may want to adjust or change your device settings to enhance call performance.
If you find that the call quality is lacking, first verify that you have selected the right device for the test. Teams might not automatically select the device you want if you have multiple certified devices connected concurrently. You can use any device to connect that has the correct software requirements, not just the ones that are certified.
Navigate to the “Devices” section in your Teams Settings to choose the default mic for your speakers and microphone. Also, ensure that your device is still working properly and correctly. Some headsets have physical mute buttons; if audio is not coming through during the test call bot, try toggling this button.
Here are some additional steps to address these issues:
Restart or update your Microsoft Teams
When you're experiencing audio issues, the first step is to make sure Microsoft Teams is updated to the latest version. Outdated software can cause various problems, including with audio. Go to your profile picture and choose "Check for Updates," then restart Teams after applying any updates.
You might also resolve the issue by restarting Teams or your device. This action can clear temporary files that might be causing problems.
Examine any app glitches
Sometimes, addressing issues after a Teams test call is as simple as checking a few basics. Start by confirming that your microphone isn’t accidentally muted in the app. If you see a line through the microphone icon, it means your mic is turned off and it is working properly.
To unmute your voice, just click the microphone icon again. If you’re participating in a meeting, keep in mind that the host may have temporarily muted your microphone, so you’ll need to wait for permission to unmute yourself.
Additionally, check your audio device settings for any potential issues. Go to the “ audio devices” section in your “Settings” tab and inspect options like noise suppression, secondary ringer, spatial audio, and microphone sensitivity. Adjust these settings if needed and perform another test call to determine if the problem is resolved.
Check your device settings for problems
Using Microsoft audio devices typically ensures compatibility with Teams. However, non-certified devices might not integrate smoothly with the Teams app.
For devices that are supposed to be compatible with your Teams, audio issues might stem from corrupt or outdated drivers. If you’re using a microphone with a USB, reinstalling its driver could fix the problem.
To update your Windows drivers, click on “Start” and search for “Device Manager.” Go to “video, sound and game controllers,” right-click on your device, and click “Uninstall.” Then, select “Actions” and choose “Scan for any hardware changes” to reinstall the driver.
“Make a Test Call” Option Alternative
To test your microphone and your camera's video, in Microsoft Teams, use the "Meet Now" feature. Start a "Meet Now" meeting, adjust settings as needed, and join. For a thorough test recording immediately, invite a colleague or join the meeting from another device. Check audio, video, chat, and screen sharing when you answer incoming calls.
Conclusion
Conducting a Teams test call is crucial for optimizing call quality and ensuring smooth meeting experiences. By identifying and resolving potential issues, you can enhance participant engagement and productivity.
Bluedot goes beyond simple transcriptions; it offers comprehensive meeting management solutions. Record, transcribe in 17 additional languages, and securely store your meetings, including screen-sharing sessions with Bluedot's amazing features.
You can generate automatic meeting templates, leverage auto-generated emails, and streamline your workflow. With Bluedot, you'll transform your Microsoft Teams meetings into productive and actionable events.
%201.svg)
